Family Registration Form Set Up (w/ Paypal)

Setting up your Paypal Enabled Family Registration Forms

Premium Plus Paypal Members have the ability to add Paypal Payments to your online forms. This example will teach you how to add a Paypal Payment to your Family Registration form, but this can be applied to any pre-built forms or to your own custom created forms.

 IMPORTANT: You still need to follow the instructions to set up your Family Registration Form that are included HERE. This tutorial is only regarding adding Paypal to your form, so please be sure to complete THIS TUTORIAL first.

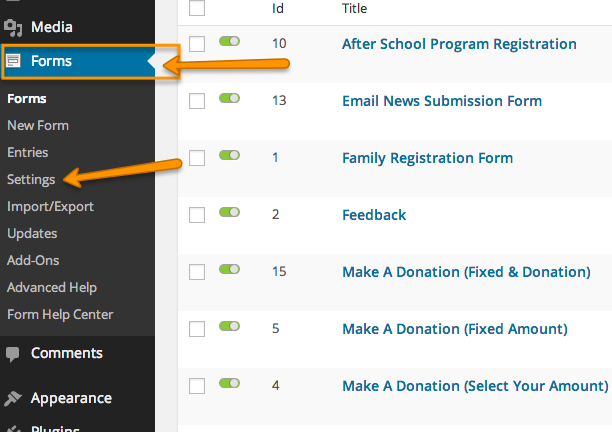
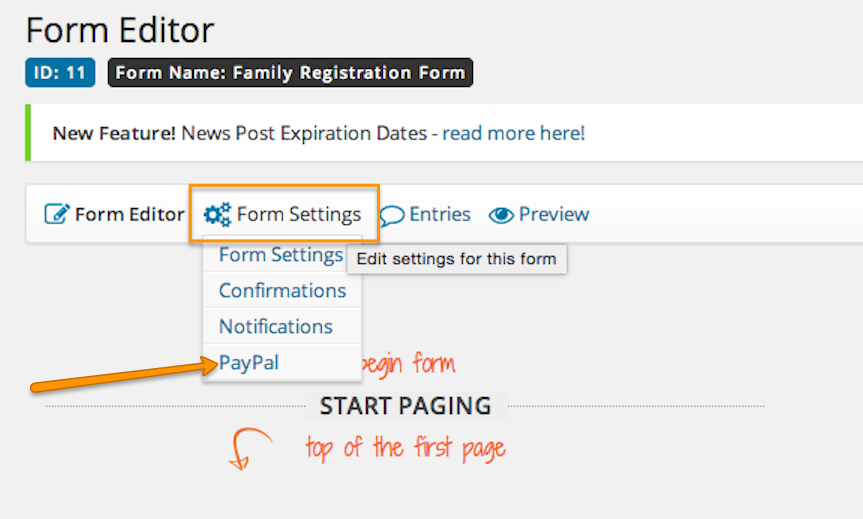
Step 1: Access Form Settings (FORMS > SETTINGS)

accesssettings

Click on FORMS and then SETTINGS to access the settings for your form system.

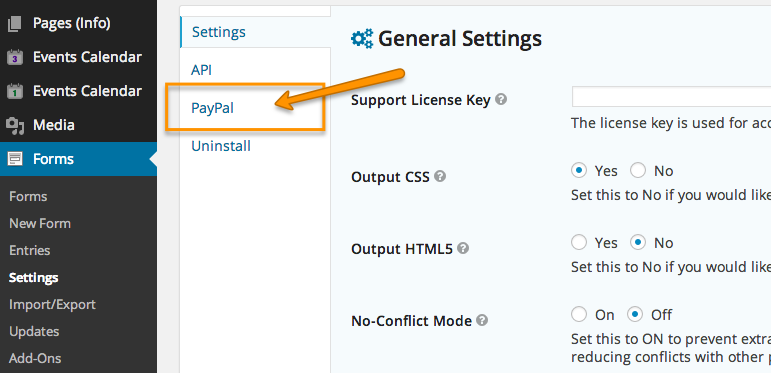
Step 2: Go to Paypal Settings

paypal-settings

In order to allow payments via Paypal, you must first set up your Paypal Settings. This is a one time set up. To get started, click the PAYPAL link in the Settings Menu.

Step 3: Copy your IPN URL

copyipn

It sounds complicated, but it’s not. Simply copy the URL on your screen that is located inside the orange box we’ve highlighted above. You’ll need this link in a minute.

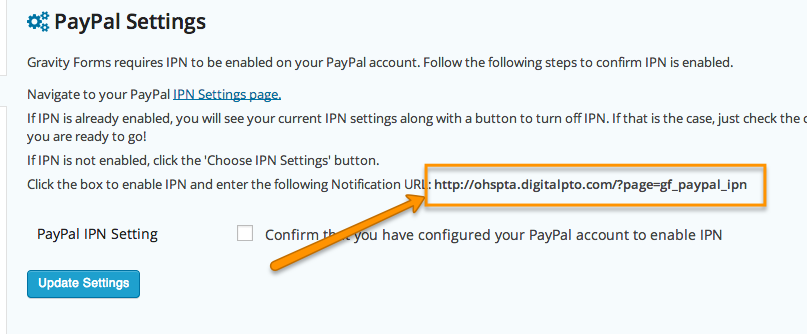
Step 4: Complete Required IPN Settings

IPN

When you access the Paypal settings page, you will be asked to set up your Paypal IPN (Instant Payment Notification) settings within Paypal and then verify that you have completed that step. First Click on the link that says IPN SETTINGS PAGE. This will open a new window with a Paypal log in screen.

Step 5: Log In and the CHOOSE IPN SETTINGS

choose-ipn-settings

Once you log into to your Paypal account, you will be directed to the IPN Page. Click on the CHOOSE IPN SETTINGS button.

Step 6: Enter your Notification URL, Enable IPN Messages & Save

enter-url

You will now see a field asking for your Notification URL. This URL is found on your Digital PTO Paypal settings page and will look something like this: http://yourdomain.digitalpto.com/?page=gf_paypal_ipn – Copy that URL and paste it into the NOTIFICATION URL dialogue box. Then under IPN Messages, check RECEIVE IPN MESSAGES (ENABLED) and then click SAVE.

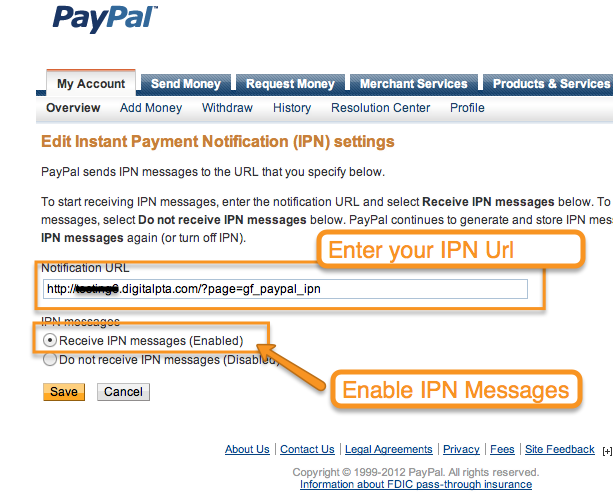
Advanced Note: If your IPN is already active and you have another Notification URL populated here, you do not need to populate the Digital PTO Form IPN Notification URL. Digital PTO/PayPal only requires that the IPN is enabled and that any Notification URL is populated in your PayPal settings. The Digital PTO Form IPN Notification URL is sent as the ‘return_url’ parameter for every PayPal Add-on transaction.

Step 7: Confirm that IPN is Enabled

ipn

Once you SAVE your Paypal IPN URL, you can close the Paypal window and back at Digital PTO you need to check the box that is Confirming that you have configured your Paypal IPN settings. There is no need to click save once you have checked that box.

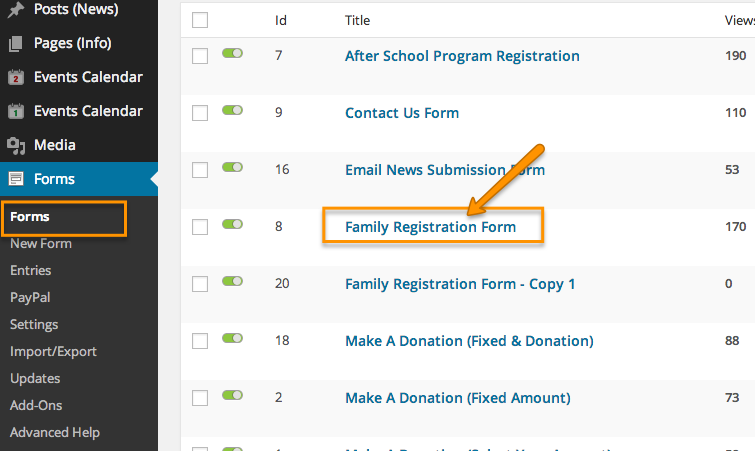
Step 8: Select a Form to add Payments to

editform

Before you can set up the rest of the Paypal Settings, you need to add something to “buy” to your form. Click on the FORMS link to access your list of forms and then select the form you wish to modify. We are using the Family Registration form in this example.

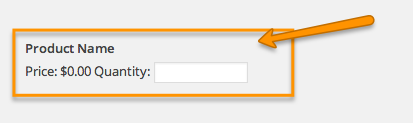
Step 9: Add some Pricing Fields

clickproduct

To the right of your form, you will see the option to add PRICING FIELDS. If this menu isn’t opened, click the down arrow to expand it. We are going to add a PRODUCT in this example. Even though we are selecting a PRODUCT, this can be anything from a t-shirt to a PTA Membership, it does not have to be a physical product. Click PRODUCT and a product field will be added to the bottom of your form.

Step 10: Open Product Options

clickname

Scroll to the very bottom of your form and you will see your newly added Product Field (Product Name). Click on the field to open up the options available.

Step 11: Populate Field Label (Product Name)

name

Enter the name of the product or service in the FIELD LABEL field. For our example, we are entering “PTO Membership Options” and we will be giving three different membership levels to pick from.

Step 12: Select the Field Type

fieldtype

There are a variety of ways to present your product & services selections, but we typically suggest either a drop down menu or a radio button menu. In this example, we are going to use a Drop Down Menu, so we will select DROP DOWN MENU from the options. You can also leave the setting as a SINGLE PRODUCT if you do not wish to offer any options.

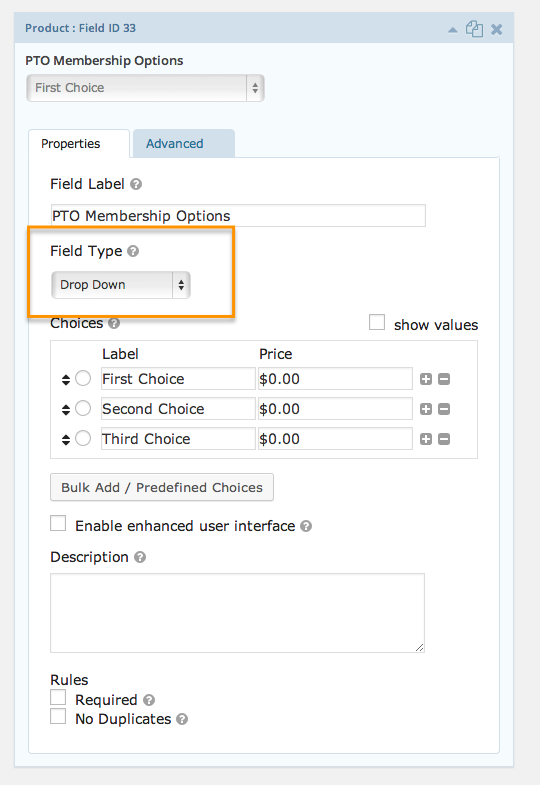
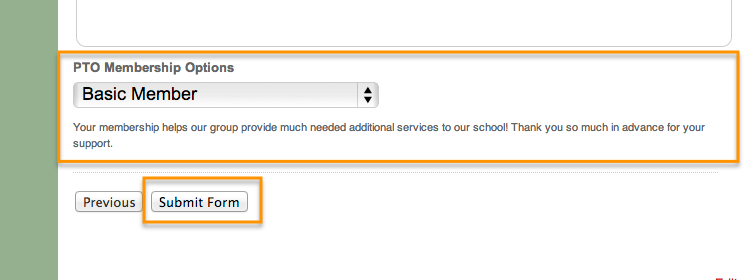
Step 13: Define your Drop Down Options & Pricing

drop-downs

You will notice when you select Drop Down Menu that your options will change. Three options are presented by default but you can always add more by clicking the plus sign, or remove some by clicking the minus signs.

We are going to offer three levels. Free (non-member), Basic Member and Gold Member. We will be charging for the Basic and Gold, and the free option will not have a fee associated with it. The Free Option can be a good thing to offer if you want families to register with your group regardless of whether they join the PTA / PTO.

Step 14: Enter an optional Description

description

If you would like to provide more information to your members about their options, you can enter more details in the DESCRIPTION field. This is a good place to remind families why joining your Parent Group is important. 

Step 15: Update your Form

updateform

When you have finished adding your product options, be sure to click the UPDATE FORM button. Please note you can add additional products if you would like. Those are not covered in this tutorial, but we do offer additional tutorials on paypal options.

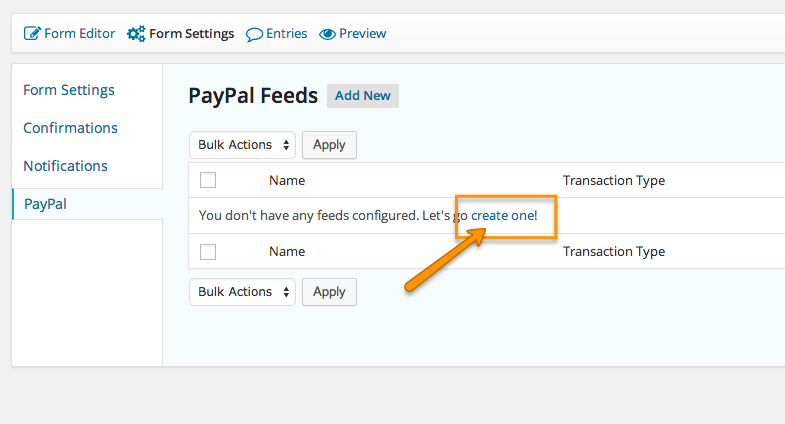
Step 16: Go to FORM SETTINGS > PAYPAL

formsettings-paypal

Once you have saved your form, hover over the FORM SETTINGS menu and select the PAYPAL option.

Step 17: Configure Feed (if needed)

configurefeed

If you do not have any feeds yet, you can click the CREATE ONE link or the ADD NEW button above.

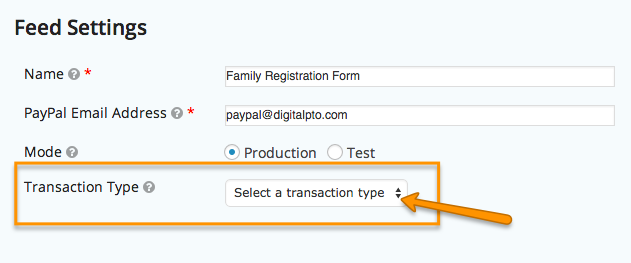
Step 18: Name your feed

name-feed

Name your feed so you’ll know what it is in the suture. We suggest naming it the same as the form name.

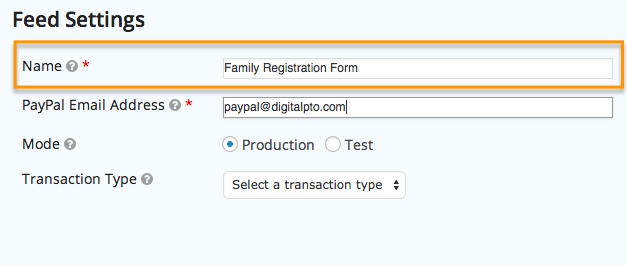
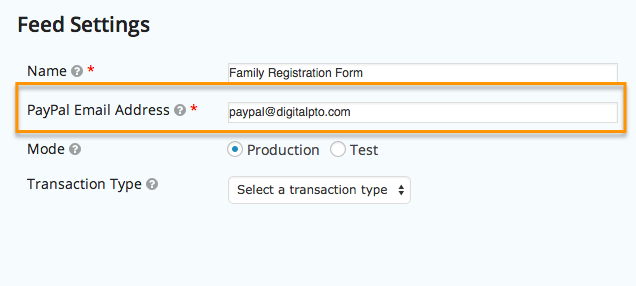
Step 19: Enter your Paypal Email Address

paypal-feed

The next step is to enter your groups Paypal email address. Note that this address can be different on different forms.

Step 20: Select Production Mode

mode-feed

Unless you know exactly what you are doing, keep the MODE set to PRODUCTION.

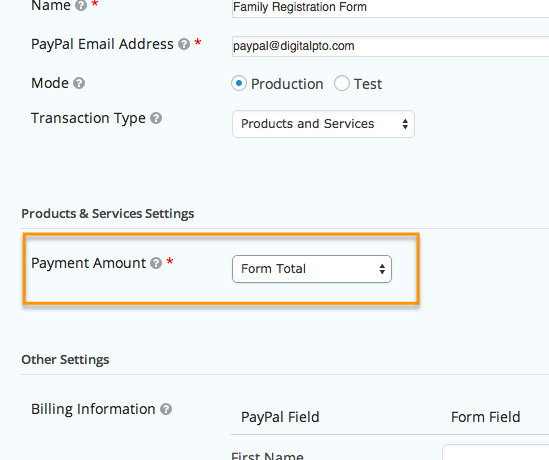
Step 21: Select your Transaction Type

transaction-feed

There are three Different types of Transaction types available. This tutorial will cover both Products & Services and Donations. Subscriptions & Recurring Payments are covered in a different tutorial. Select which type of transaction you wish to specify. In our example, we are using the standard PRODUCTS & SERVICES.

Step 22: Select Payment Amount

payment-amount

More than likely you will want to use the FORM TOTAL for the Payment Amount, but that can be adjusted here.

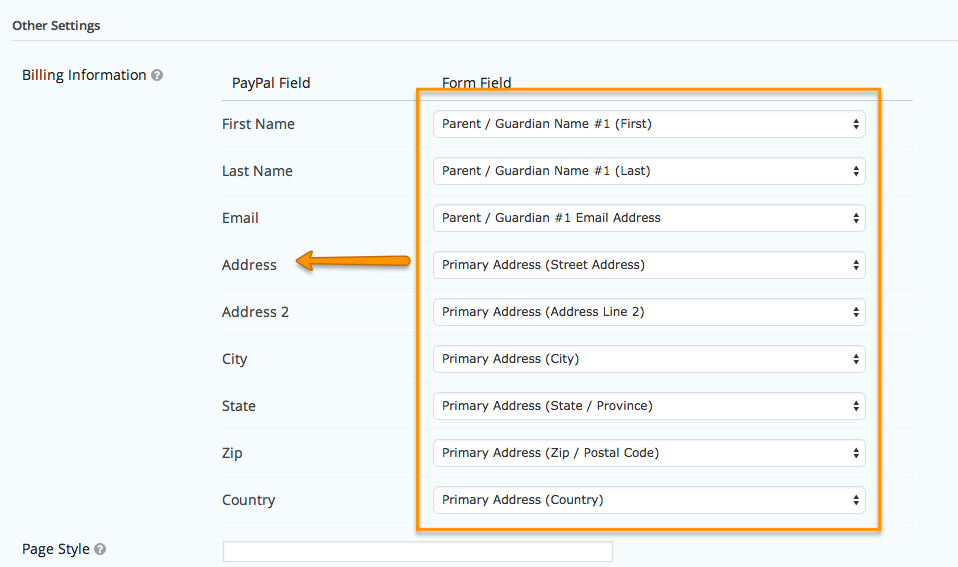
Step 23: Match the Paypal Fields to your Form Fields

match-fields

Now you want to match your Paypal fields to your form Fields. Any fields you have already asked your user to populate will be pre-populated when the paypal page opens, so this will save your visitors time.

Step 24: Customize your Continue/Return Button

continue-button

Once your users have completed payment they are presented with a button to return to your website. If you would like to you can enter your own custom button text here. This is optional.

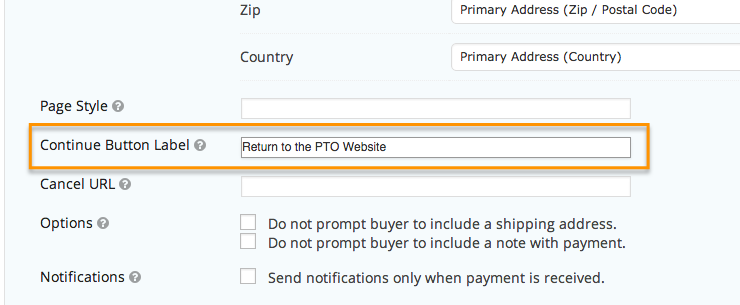
Step 25: Specify your Options

specify-options

You can select a few additional options at the end of the form based on your needs. Our example form is for a PTO membership, so we do not need a shipping address or notes with our payment so we will check both of those boxes.

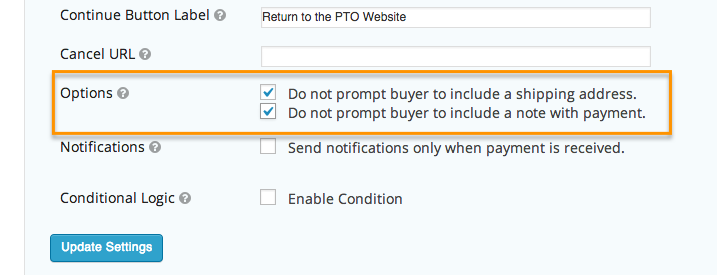
Step 26: Notification Settings

notifications

You can also set your form so that you only receive an email about a form submission after it has been paid for. This is the recommended setting.

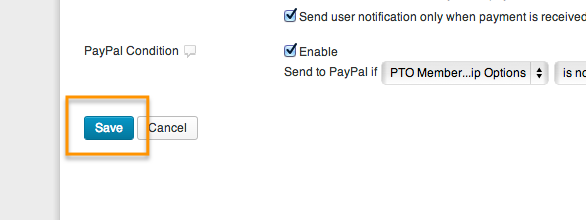
Step 27: Enable Paypal Conditions (if needed)

condition

Our specific membership form includes the option to not pay, so we are going to enable Paypal Conditions so that non-paying members are not sent to Paypal for payment. First we will click the ENABLE button and then we are going to set the condition to SEND TO PAYPAL IF “PTO Membership Options” IS NOT “I don’t want to join”. This will make the form skip paypal if that option is selected.

Step 28: SAVE your work!

savework

When you are finished setting everything up, be sure to click SAVE to save your work.

Step 29: Preview your Live Form

checkyourwork

When everything is saved and completed, be sure to go to your live form and test it out. Select a membership level and ensure that you are taken to Paypal to make payment. If you added a non-member option, test that as well to ensure that you are not taken to Paypal. Congrats! You’ve set up your Family Registration Form completely!